
How to Bleed Brake by Yourself!
Car Repair January 29, 2017 0
The car’s braking system is very sensitive to air bubbles, which compromise the efficiency of the braking system and can result in brake failure. So, how to bleed brake by yourself will help. But how do these air bubbles get here in the first place, you might ask? The most common reasons are because of fluid which is subjected to high temperatures and which releases air in the form of vapor into the braking system, and as a result of leaks in the system’s sealing. However, it is also possible for air to seep in through worn pads.
For optimal performance, brakes ought to be bled, a process which removes air from the braking system, ideally every two to three years. However, as models and manufacturer’s requirements differ, it is crucial to consult your owner’s manual when you are considering bleeding. Brake bleeding is a rather cumbersome and unpleasant task even when conducted by two individuals, hence the reason some swear that it is impossible for one man to accomplish the job. In this tutorial, we will discuss how to bleed brake by yourself using three very easy methods.
Method 1: How to bleed brake by yourself manually.
Materials and equipment you will require
- A turkey baster.
- Lint-free rag.
- Bleeder hose. This is a pipe about 12 inches long, and whose diameter fits securely on your bleeder screws. Alternatively, you can use plastic tubing with the same dimensions, such as an aquarium tube. The bleeder hose needs to be clear to allow you to see air bubbles.
- You will need a box wrench which can be able to loosen your vehicle’s bleeder valves. In place of a box wrench, you can use an offset wrench.
- You will also need a clean clear bottle, or a container of some sorts, preferably with a lid.
- Drill a hole in the lid of the bottle, tight enough for only the bleeder hose to go through.
- Drill an additional small hole in the lid to ensure that trapped air has a way out.
- Fill this bottle a quarter or a third way up with clean brake fluid.
- Immersed the bleeder hose into the bottle past the level of the fluid. This is to ensure that air is not sucked back in from the container when you bleed.
Before Bleeding
Loosen the lug nuts from all the wheels. Remove all four wheels and ensure that the vehicle is firmly supported by jack stands.
Using a turkey baster, suck out the old brake fluid from the brake fluid reservoir, located in the hood of your car. This fluid needs to be expelled as it is contaminated, and contains dirt and metal particles. You can use the lint-free rag to clean up the reservoir of debris.
Replace with fresh brake fluid. It is also crucial to fill up the reservoir to the maximum level.
Safety Precautions
• Bleeding starts on the right rear, and moves to left rear, right front and finally to the driver’s side. The purpose of this is to reduce the chances of the old fluid mixing up with the new one.
• Ensure that the vehicle is jacked up properly.
• Do not use old brake fluid to bleed. Always fill up the reservoir with fresh fluid. Also, ensure that at no point during the bleeding process does the oil fall below the halfway mark.
• One of the most crucial things to keep in mind in this how to bleed brake by yourself tutorial is to never let air get into the braking system.
• Finally, be cautious when handling brake fluid, particularly on or near the painted surfaces of your car. Brake fluid is a very effective paint thinner, and removes paint very fast.
It helps to have some towels in handy, and to wash off any spills or smudges as soon as they occur.
The Actual Brake Bleeding
- Locate the bleeder screw and remove the black rubber cap on it.
- Using the box wrench, loosen the bleeder bolts. If these are unable to come off, try dabbing them with some oil and letting the oil penetrate for at least a day.
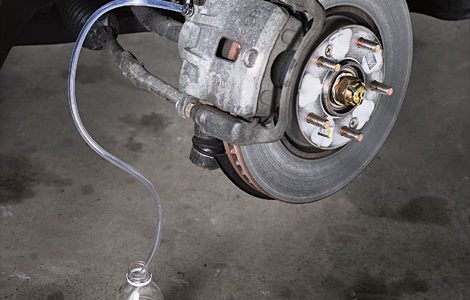
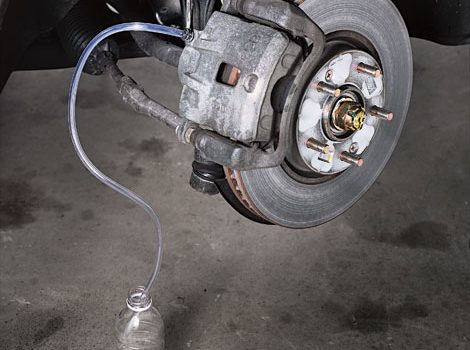
- Attach one end of the bleeder hose to the nipple of the bleeder screw.
- Attach the other end to your clear bottle with clear brake fluid. To ensure that no air is sucked back, secure the bleeder hose and nipple connection point with a seal such as a tie-wrap.
- Pump the brakes. Make sure it goes all the way through, but do not exceed 10 pumps.
- After this, check the tubing and the bottle for old fluid and bubbles of air. If you notice either of these, check the reservoir, and top it up with extra fluid. It is also crucial to note that the fluid level normally drops when bleeding, hence the need to continually be on the lookout.
Repeat the process.
Once you are certain that all the air is out, fasten the bleeder valve and move on to the next brake line.
Method 2: How to bleed brake by yourself using a vacuum pumping kit
A vacuum pump is a small hand held device which is attached to the bleeder screw and using pumping action sucks out air and fluid from the bleeder lines. The gadget is relatively inexpensive, and is commonly used by mechanics. Bleeding brakes using the vacuum pumping kit follows the aforementioned process i.e. take note of things to do before and safety precautions.
Method 3: How to bleed brake by yourself using a bleeder kit.
Brake bleeder kits are inexpensive, and are designed to help bleed brake by yourself. Most can be dismantled and are easy to use. However, brake bleeder kits use the same technique as the manual clear bottle with clear hose. If you master this technique, then you could save yourself some few bucks.
After bleeding your brakes, you should notice improved brake functionality. The pedal should also be easier to press. Most manufacturers recommended that you take a road test first to confirm proper functioning.
No comments so far.
Be first to leave comment below.